Understanding Online Teeth Whitening Photo Editing
In today’s digital age, the quest for the perfect smile extends beyond dental clinics and into the realm of online photo editing. Photo editing online teeth whitening is not just a trend it’s become an essential skill for anyone who wants to enhance their portraits, selfies, and professional headshots. This guide delves into the secrets of achieving a brighter, more confident smile through the power of online photo editing. We’ll explore the importance of teeth whitening in photos and why online editing tools are the go-to solution for quick, effective results. Whether you’re a social media enthusiast, a professional photographer, or simply someone who wants to look their best, mastering these techniques can significantly impact your image.
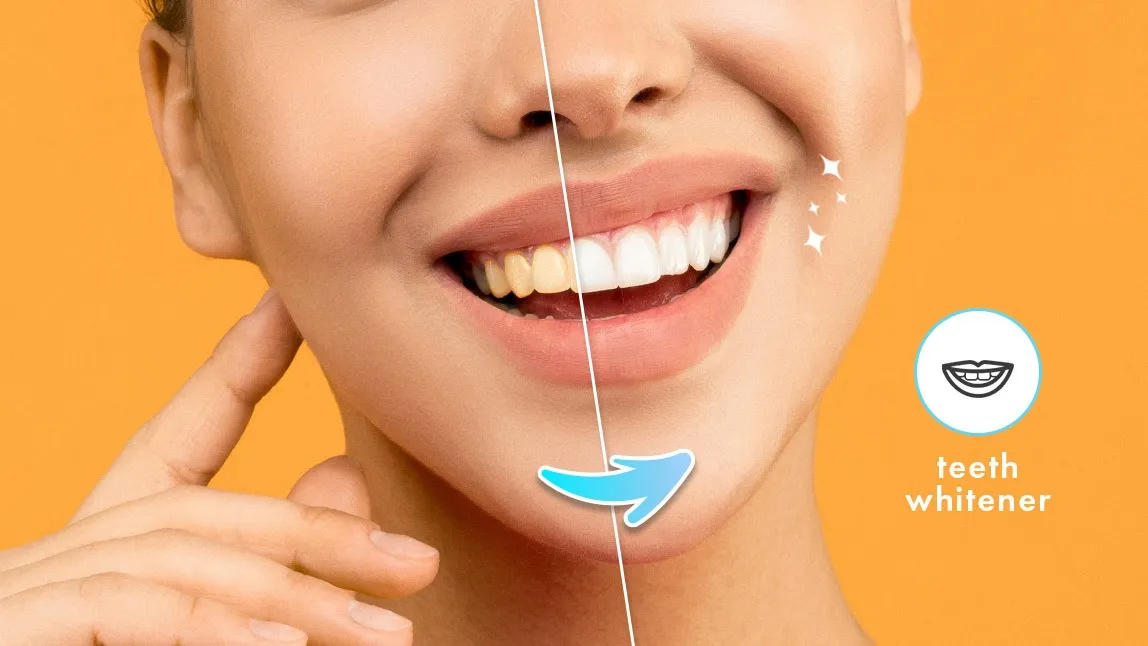
The Importance of Teeth Whitening in Photos
A bright, white smile is often associated with youth, health, and attractiveness. In photographs, the color of your teeth can significantly impact the overall impression. Yellow or stained teeth can detract from an otherwise perfect image, drawing attention away from the subject’s eyes and facial expressions. Teeth whitening in photos helps to create a polished, professional look, especially in situations where you want to project confidence, such as on a dating profile or during a job interview. By subtly enhancing the color of your teeth, you can improve the overall aesthetic of your images and make yourself appear more approachable and appealing.
Why Online Photo Editing is Essential

Online photo editing offers unparalleled convenience and accessibility. Unlike traditional methods that require expensive software installations and complex processes, online platforms provide easy-to-use tools that can be accessed from any device with an internet connection. This flexibility allows you to edit photos anytime, anywhere, without the need for specialized equipment or technical expertise. Furthermore, online tools often incorporate AI-powered features that automate some of the more complex editing tasks, making it easier than ever to achieve professional-looking results quickly. From quick fixes to detailed enhancements, online photo editing platforms empower users to transform their images with ease and efficiency.
Choosing the Right Photo Editor for Teeth Whitening
Selecting the right online photo editor is crucial for achieving the best results. With a plethora of options available, it’s important to choose a platform that aligns with your specific needs and skill level. Consider factors such as ease of use, the range of features offered, and the overall quality of the editing tools. Some platforms specialize in portrait retouching, offering dedicated teeth whitening tools, while others provide a more comprehensive suite of editing options. The ideal photo editor should provide a balance of simplicity and functionality, enabling you to quickly whiten teeth while maintaining a natural look. Researching and comparing different platforms is essential to find the one that best fits your workflow and editing preferences.
Features to Look For in a Photo Editor
When selecting an online photo editor, several key features can significantly enhance the teeth whitening process. Look for a platform that offers a dedicated teeth whitening tool, which often includes sliders or brushes that allow for precise adjustments to the color of the teeth. Additionally, consider platforms with masking features, which allow you to isolate the teeth and prevent the whitening effect from bleeding into the surrounding areas. Other useful features include options for adjusting brightness, contrast, and saturation, as these can help to create a more natural and balanced look. The best photo editors also provide tools for removing blemishes, smoothing skin, and correcting imperfections, contributing to a more polished overall appearance.
User-Friendly Interface

A user-friendly interface is essential for a seamless photo editing experience. The interface should be intuitive and easy to navigate, even for beginners. Look for a platform with clear icons, well-organized menus, and helpful tooltips that guide you through the editing process. The design should prioritize ease of use, allowing you to quickly access and apply the tools you need. A clean and uncluttered interface reduces the learning curve, making it easier to focus on your creativity and achieve the desired results without getting bogged down in technical complexities. Platforms that offer customization options, such as adjustable layouts and keyboard shortcuts, can further enhance the user experience.
Advanced Editing Tools
While a user-friendly interface is important, advanced editing tools provide greater control and precision. Look for a photo editor that offers features such as layer-based editing, which allows you to make non-destructive adjustments to your images, and selective color adjustments, enabling you to fine-tune specific colors without affecting others. Other advanced tools include cloning, healing brushes for removing blemishes, and sharpening filters for enhancing detail. A good photo editor will offer a range of features that cater to both novice and experienced users. These tools empower you to achieve professional-quality results by giving you the flexibility to correct imperfections, enhance features, and create stunning visuals.
Step-by-Step Guide to Online Teeth Whitening
The process of whitening teeth online is straightforward and accessible. This guide provides a detailed, step-by-step approach to help you achieve stunning results. By following these simple instructions, you can transform your photos and showcase a brighter, more confident smile. Remember to practice and experiment with different settings to find what works best for each image, as well as the overall look you want to achieve.
Uploading and Preparing Your Photo

Begin by uploading your photo to your chosen online editor. Most platforms support various file formats, so you can use any image you have. Before starting the teeth whitening process, assess the overall quality of the photo. Make sure the image is well-lit and that the teeth are clearly visible. If necessary, adjust the brightness, contrast, and exposure to optimize the image for editing. This preparation step will ensure you have a solid foundation for a successful whitening process. If the photo is slightly blurry, consider using a sharpening tool to improve clarity.
Selecting the Teeth Whitening Tool
Once your photo is ready, locate and select the teeth whitening tool within the editor’s interface. This tool is usually represented by an icon that resembles a brush or a tooth. Some editors also offer automatic teeth whitening options that use AI technology to detect and whiten teeth with a single click. For greater control, use the manual tools, which allow you to precisely target the areas you want to edit. Use the selection tool to carefully isolate the teeth from the surrounding gums and lips, preventing the whitening effect from spilling over and looking unnatural. Zoom in on the teeth to ensure precision during the selection process.
Adjusting Brightness and Contrast
After selecting the teeth whitening tool, you can start adjusting the brightness and contrast. Start by gradually increasing the brightness to make the teeth appear whiter. Be careful not to overdo it, as this can create an unnatural, overexposed look. Fine-tune the contrast to enhance the definition of the teeth and make the image more visually appealing. Experiment with these settings until you achieve a natural-looking result that complements the overall aesthetics of your photo. The goal is to enhance the teeth’s appearance subtly and enhance the overall composition of the photo. Always keep the original image as a reference to avoid overediting.
Fine-Tuning the Whitening Effect

The final step involves fine-tuning the whitening effect to ensure a flawless finish. Use the editor’s brush tools to gently apply the whitening effect to each tooth individually. You can adjust the brush size, opacity, and flow to achieve the desired result. If you notice any unevenness or imperfections, use the editor’s healing brush or clone tool to smooth them out. Check for any unnatural highlights or shadows, and make subtle adjustments to create a cohesive and natural-looking result. Pay attention to the color of the teeth and gums, and make sure they blend seamlessly. The goal is to whiten the teeth without it being too obvious that the photo has been edited.
Dealing with Common Photo Editing Issues
Even with the best tools, some issues can arise during the online teeth whitening process. Understanding and addressing these issues will help you achieve more professional results. Avoiding common pitfalls can significantly improve the overall quality of your edited images.
Uneven Whitening
Uneven whitening is a common problem, resulting in teeth that appear patchy or discolored. This can be caused by applying the whitening effect inconsistently or using a tool that is too broad. To address this, carefully adjust the brush size and opacity. Apply the whitening effect in small, controlled strokes, focusing on individual teeth. You might need to zoom in to see the details. If some areas are whiter than others, use the eraser tool to soften or remove the excess whitening. By taking your time and paying close attention to detail, you can achieve a uniform and natural-looking result. Uneven whitening can be very distracting.
Over-Editing

Over-editing refers to applying too much of the whitening effect, resulting in teeth that look unnaturally bright or have a bluish tint. Over-edited images can appear artificial and detract from the photo’s authenticity. To avoid over-editing, start with subtle adjustments and gradually increase the whitening effect until you achieve the desired result. Avoid making drastic changes in a single step. Regularly compare the edited image to the original to ensure a natural appearance. If the teeth appear too bright, reduce the brightness setting or use a different shade of white. A subtle touch is always better than a heavy hand.
Preserving Natural Look
Maintaining a natural look is paramount in teeth whitening. The goal is to enhance the teeth’s appearance without making it obvious that the photo has been edited. To achieve this, use subtle adjustments. Avoid extremes in brightness and contrast. Pay attention to the texture and color of the teeth, and avoid making them appear too smooth or uniform. When editing, consider the lighting in the original photo and ensure that the edited teeth blend seamlessly. Keep the focus on enhancing the overall beauty and authenticity of the image. Use a variety of tools and techniques to achieve the most natural result possible.
Tips and Tricks for Flawless Teeth Whitening
Several tips and tricks can elevate your online teeth whitening results from good to excellent. These techniques can help you achieve professional-looking enhancements, making your photos look more appealing and polished. The secret is to practice and apply them consistently.
Using Different Photo Editing Softwares

Explore various online photo editing software options to find the best tools for your needs. Each platform offers unique features and advantages. Experiment with different software options, such as Adobe Photoshop Express, PicMonkey, or Fotor, to find one that matches your workflow. These platforms often include dedicated teeth whitening tools, along with a variety of editing options for overall photo enhancement. Compare the quality of the results you get from each software. If you’re a beginner, consider starting with more user-friendly interfaces. As you gain experience, you can explore more advanced software to achieve even better results.
The Role of Lighting
Lighting plays a crucial role in the effectiveness of teeth whitening. When editing, pay attention to the lighting in the original photo. If the lighting is uneven or harsh, it can make the teeth appear unnatural after editing. Try to edit photos taken in soft, even lighting. If you have a photo with unfavorable lighting, try adjusting the lighting settings in the editing software. Consider adding subtle highlights or shadows to the teeth to enhance their appearance and make them look more natural. Pay attention to how the light reflects off the teeth and ensure that the edited result complements the lighting conditions.
Saving and Sharing Your Edited Photos
Once you are satisfied with your teeth whitening edits, it’s time to save and share your photos. Most online editors allow you to save your images in various formats, such as JPEG or PNG. Choose the format that best suits your needs. If you intend to print the photos, save them in a high-resolution format. If you intend to share them online, consider the file size and compression settings to optimize the image for the platform you will be using. Before sharing your edited photos, review them one last time to make sure everything looks perfect. Once you are satisfied, upload and share your photos on social media, in emails, or wherever you want to show off your enhanced smile.